Once you have an idea on which model you may want it’s time to plan your install! This guide will help you plan for your install and go over some things that you may not have thought about before you buy.
As a reminder, if you feel like doing this install may be above your comfort zone, you may want to find an installer. Multi-level homes can be difficult to install especially if you are not comfortable on a ladder, renting a lift is often the suggested option. Please stay safe during your install, a serious injury or fall is not worth it if you are not comfortable doing this on your own.
Table of Contents
Finding Length of Lights
When deciding how much length to buy, always order a bit extra. It’s not fun to start installing and realize you need more. But with the Permanent Outdoor Lights, you can easily add another strand if you have one and aren’t at the maximum length yet.
To get an accurate measurement, measure the length of your walls. If you want a quick estimate, use Google Maps to get a rough idea of your roofline’s measurements. Follow the tutorial below to see how you can do that. It won’t be super accurate, so I recommend adding a little extra length to what you calculate from this method. But it should give you a good idea of how long you’ll need.
Plan your run starting from your power source and wrapping around your house as best as possible. When planning your run, also keep in mind where you plan to end the run. Try not to have your run end in a place where it might look odd if you ran out of lights, but that shouldn’t be too much of an issue if you measure and plan properly.
Mounting Brackets or Tracks
All models come with 3M VHB and some cable clips to help hold up the wire. If you plan to install the lights as is make sure you clean the surface you are mounting on before sticking the VHB to the surface. Heating the surface also promotes better adhesion.
Alternatively, if you do not trust the VHB tape to keep the lights stuck in place, many people will often go the route of getting either mounting brackets or for the most professional look, tracks. I would personally suggest looking at brackets especially if you have a multi-story home, I would not want to need to go up there again to fix falling lights.
Mounting Brackets
I wrote about brackets in the previous guide, Choosing the Right Permanent Outdoor Lights, if you have not checked it out you may want to. Here are some links to the mounts mentioned there.
- Version 1/2/Elite
- Pro
- Sellers
- Printworks3D
- If you would like to be added to this list please contact me!
Tracks

For the most professional look tracks are a great choice, though they do come at a cost. For a less expensive track option people have been known to use different options such as generic cable tracks or J-channel trim to install as well. Tracks are also helpful in situations where animals may be chewing on your wires, these will add extra protection.
- Professional
- DIY
Mounting Distance
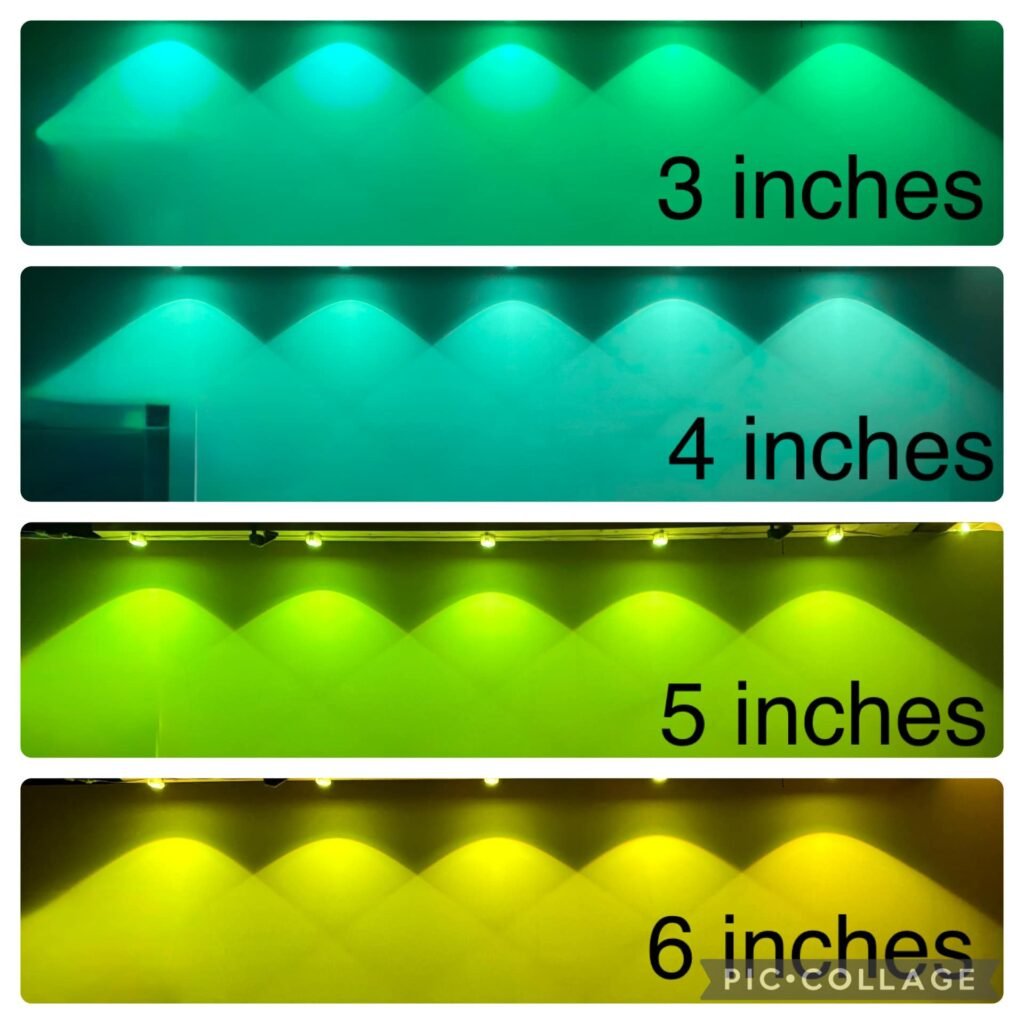
Mounting distance is suggested to be installed about 2-4 inches from the wall. The closer to the wall the more pronounced of a conical shape can be seen, while the further from the wall will create more of a shadow at the top. For those with soffits and who have a flat 90-degree surface to mount to, this is the easiest to mount at that suggested distance.
For those with open eaves, or any mounting surfaces that are not parallel to the ground, you may want to test how you want the lights to look by holding them up at different distances and finding your optimal mounting position. This trial and error is often because the angle of the eave can affect how the light projection looks.

I have open eaves and opted to go with mounting 2×1 wood strips and mount on that. I spaced my 2×1 wood strips to be 2″ from the fascia rather than 2″ from the wall. I chose this distance due to the angle of the eaves, and because our home has styrotrim accents around windows and doors. If I mounted it too close to the wall, the styrotrim accents would block some of the light from shining down.
Splicing and Extensions
I also wrote about this in my last guide, so you may want to check that out if you have not already on: Chosing the Right Permanent Outdoor Lights. But here are some additional notes to keep in mind.
For version 1 and version 2/Elite, you cannot splice an extension between two lights that to make a jump longer than 12 ft without either having data booster or light in that gap. Some people have been either damaging a light or blacking out a light in the middle of the of long runs to make those larger jumps.
Pros will allow you to make larger jumps with no issues. But don’t forget to use the in-line driver that is included in the 200 ft kit if you are going beyond 150 ft (90 lights).
All lights strands are directional, so if you are cutting your lights to splice them, remember which way the strand was going when you plan to reuse the cut off portion. Data will not flow to the lights if you install them on backwards.
Mounting Solutions
Eaves with Soffit
The light strings are easier to mount on homes with soffits that will allow easier mounting. For mounting on soffits, I would suggest using the VHB to temporarily mount your lights as desired. Once in their positions and you are happy with the placement, use mounts to secure the pucks to the soffit using screws to establish a mechanical attachment to the soffit.
These types of installs also look amazing with tracks or siding trim mentioned above. People have notched out space for the puck to stick out while hiding the wire in the channel of the trim.
Open Eaves without Soffit
If your home has open-style eaves, I would suggest as many of us have done, which is to use 2×1 wood strips installed under your eaves to provide mounting points for your lights. 8ft 2×1 strips are very cheap at home improvement stores and can be easily painted to match the color of your home’s eaves before installation.
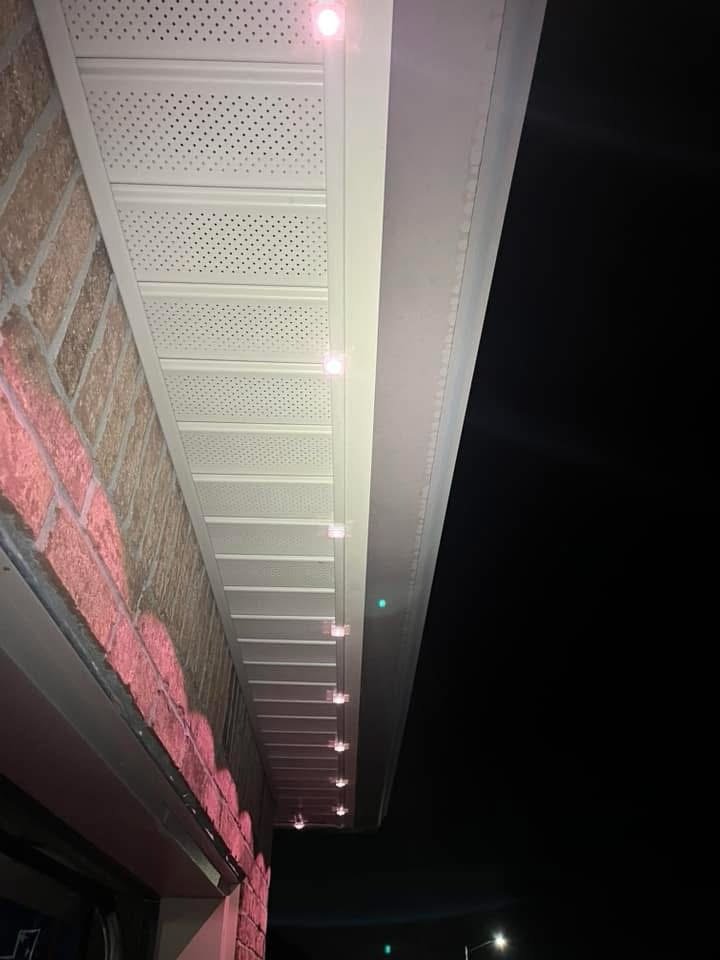
Alternatively, a person in an FB group I am a part of has designed 3D printable mounting brackets to install on the inside face of your facia. It creates a rather unique almost prism-like casting of light on the house, see the example below. This is likely the method I am going to be using when I redo and clean up my installation.

Little Lips or No Eaves
This is one of the more difficult installs but it can still be done. What I have seen people do is install their lights using J Channels and inserting the long part of the J Channel underneath the shingles/flashing of their roof. Others have also used 90 degree brackets to screw into the side of the wall and have a mounting surface for the pucks.

Anthony recommends using a Flashing Cap to install in similar situations. These can be found in the Gutter section of Home Depot.

Mapping Your Lights Path – Install Tips
To plan out which length you should purchase the first thing you should do is plan how you will be running your strands on your home and take measurements to find the best set for you. When you buy your set make sure that you leave room for error and possibly buy a longer length if you are cutting it close to your actual measurements.
Start with a picture of your home and draw the lines of how you plan to run your lights. I like to use 1 color to mark where the lights will go, then use another color to plan out the extensions (if needed). Keep the following tips in mind when mapping out the lights.
- Keep your strings up near a wall for the best effect
- If you have a porch/patio cover or something similar, run your lights near the wall of the home rather than following the protruding edge of the covered area.
- If you have gables, follow the triangular section rather than the bottom as it looks best. Loop back to do the bottom if possible or skip it.
- If you have peaks, do a soft install running up to the peak, I would then recommend using a bracket to mount a light pod to the center of the peak then pull the excess to the sides at the bottom of the peak. *This makes the installation harder but looks the best for peaks IMO. If you do not want a light at the peak, I would suggest centering the strand at the peak and mounting the pucks symmetrically down the sides of the peak.
Installation Notes
- When installing on peaks, do one of the following:
- Install with the middle of the wire at the peak to symmetrically have the lights going down the sides, tuck or hide any excess at the bottom.
- Get a mounting bracket to help install at the middle of the peak aiming perfectly down.
- Use a clip or bracket at each light to ensure an secured install and prevent needing to go up again in the future to fix fallen lights.
- Mount lights on a flat parallel surface if possible to ensure that the lights look more uniform when they cast their lights
- If you have lights leftover, Govee does not sell additional power adapters and control boxes to use those as a separate set. You would need to find a set on eBay or other third-party marketplaces. Alternatively you can look into WLED if you find yourself capable to do that mod.
- Version 1, Version 2/Elite
- You cannot buy extra strands and expand beyond 150 ft (90 lights).
- Pros
- Install the Driver Module after the 5th strand if you go beyond 150 ft.
- If you are close to 200 ft, consider purchasing 2 100 ft kits so that just in case you needed more length you still have some room to add a couple strands.
Example Install
Installers
If you are an installer and would like to get listed here please contact me!
Leave a Reply