If you have multiple scenes or DIYs that you want to set your lights to instead of just selecting one, you can use Auto-Play to do that for you. Auto-Play allows you to select your scenes, set how long you want them to play, and have them rotate sequentially or randomly. Here is how you do it in the app.
- Select the Product that you want to setup Auto-Play
- Scroll to the bottom and go to Auto-Play, press Create.
- Give your Auto-Play settings a Name
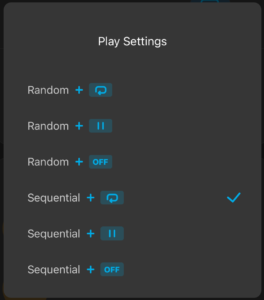
- Select your Play setting
- Tap on the Edit button near Lighting Effects to go to Lighting Effects screen
- Find the scenes that you want to add and tap them to add them to the list
- Once on your list, tap on each one that you want to adjust the length of time that it will play.
- Press the check to save your Lighting Effect
- Press the check to save on the Auto-Play settings screen
- Turn on Auto-Play using the switch
That is how you setup Auto-Play settings. This does require the products to be on Wi-Fi as it uses Govee’s cloud to send the commands to change the scenes. You can also setup multiple Auto-Play settings for different days or holidays, etc.
Auto-Play cannot be controlled by Automations in the app, but you can control them via Alexa.
Auto-Play Settings
In the Play settings screen you will find different options. You can have your selected scenes play randomly or in the order that you selected them on the list. Make sure to pay attention to the second icon. The first icon is for it to repeat at the end of the loop of scenes. The second icon will pause on the last scene in the loop of scenes. The off icon will turn the lights off after the loop.
Leave a Reply